> ## Documentation Index
> Fetch the complete documentation index at: https://www.agent37.com/docs/llms.txt
> Use this file to discover all available pages before exploring further.
# Tailscale
> Install Tailscale, get your tailnet IP, and access OpenClaw Web Chat securely
Use this guide to install Tailscale, turn it on, get your Tailscale IP, and open OpenClaw Web Chat through your private tailnet. This is a practical way to access OpenClaw securely from another device without exposing the gateway on the public internet.
**What you’re setting up (quick mental model)**
* Your **Agent37 instance** runs OpenClaw and exposes the Web Chat UI on port **18789**.
* **Tailscale** gives the instance a private, routable **Tailnet IP (100.x.x.x)**.
* You open the Web Chat from your laptop at `http://:18789/`
* You must whitelist that browser origin in `openclaw.json` via `gateway.controlUi.allowedOrigins`
* You authenticate to the gateway using `gateway.auth.token`
## Video walkthrough
## What this setup does
Tailscale gives each approved device a private tailnet IP, usually in the `100.x.x.x` range. Once the OpenClaw host is reachable through that network, you can open Web Chat from another approved device on the same tailnet.
## Prerequisites
* An Agent37 instance you can open a terminal into
* A Tailscale account (Google/GitHub/Microsoft/email login)
* Tailscale installed on your laptop (signed into the same Tailnet)
## Part A: Install + sign in to Tailscale on macOS
### Step 1: Download
1. Go to [https://tailscale.com/download](https://tailscale.com/download)
2. Download **Tailscale for Mac** (a `.pkg` installer)
### Step 2: Install
1. Open the downloaded `.pkg`
2. Follow the prompts (Continue → Install)
3. Enter your Mac password if prompted
### Step 3: Sign in
1. Open **Tailscale** (Applications → Tailscale)
2. Click **Sign in**
3. Complete authentication in your browser
4. Authorize your device
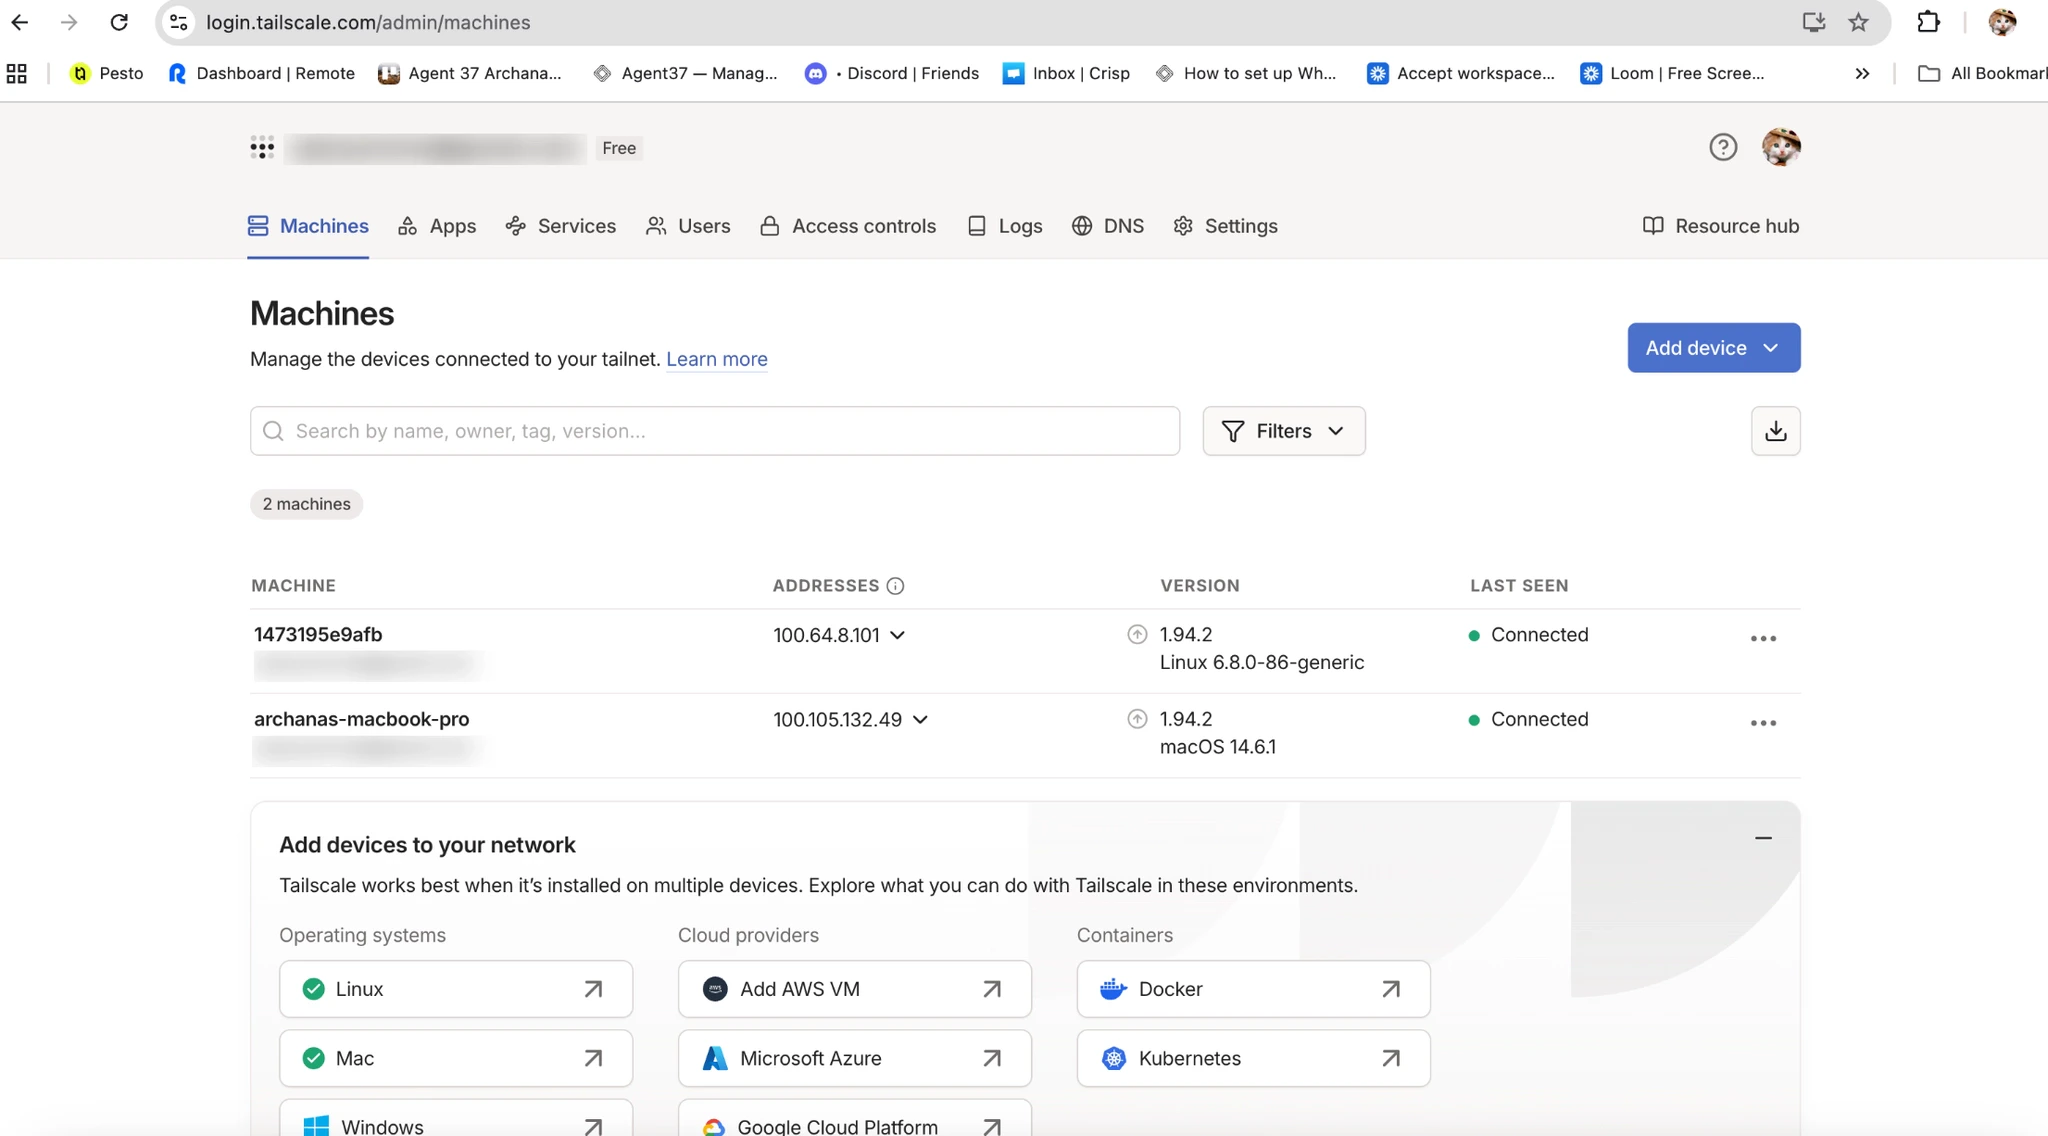
5. Toggle Tailscale **On** You’ll see:
* Status: **Connected**
* Your **Tailscale IP (100.x.x.x)**
### Step 4: Confirm it’s working
* In the Tailscale app, verify the status shows **Connected**
* Note your laptop’s **Tailscale IP (100.x.x.x)**
## Part B: Connect your Agent37 instance to Tailscale
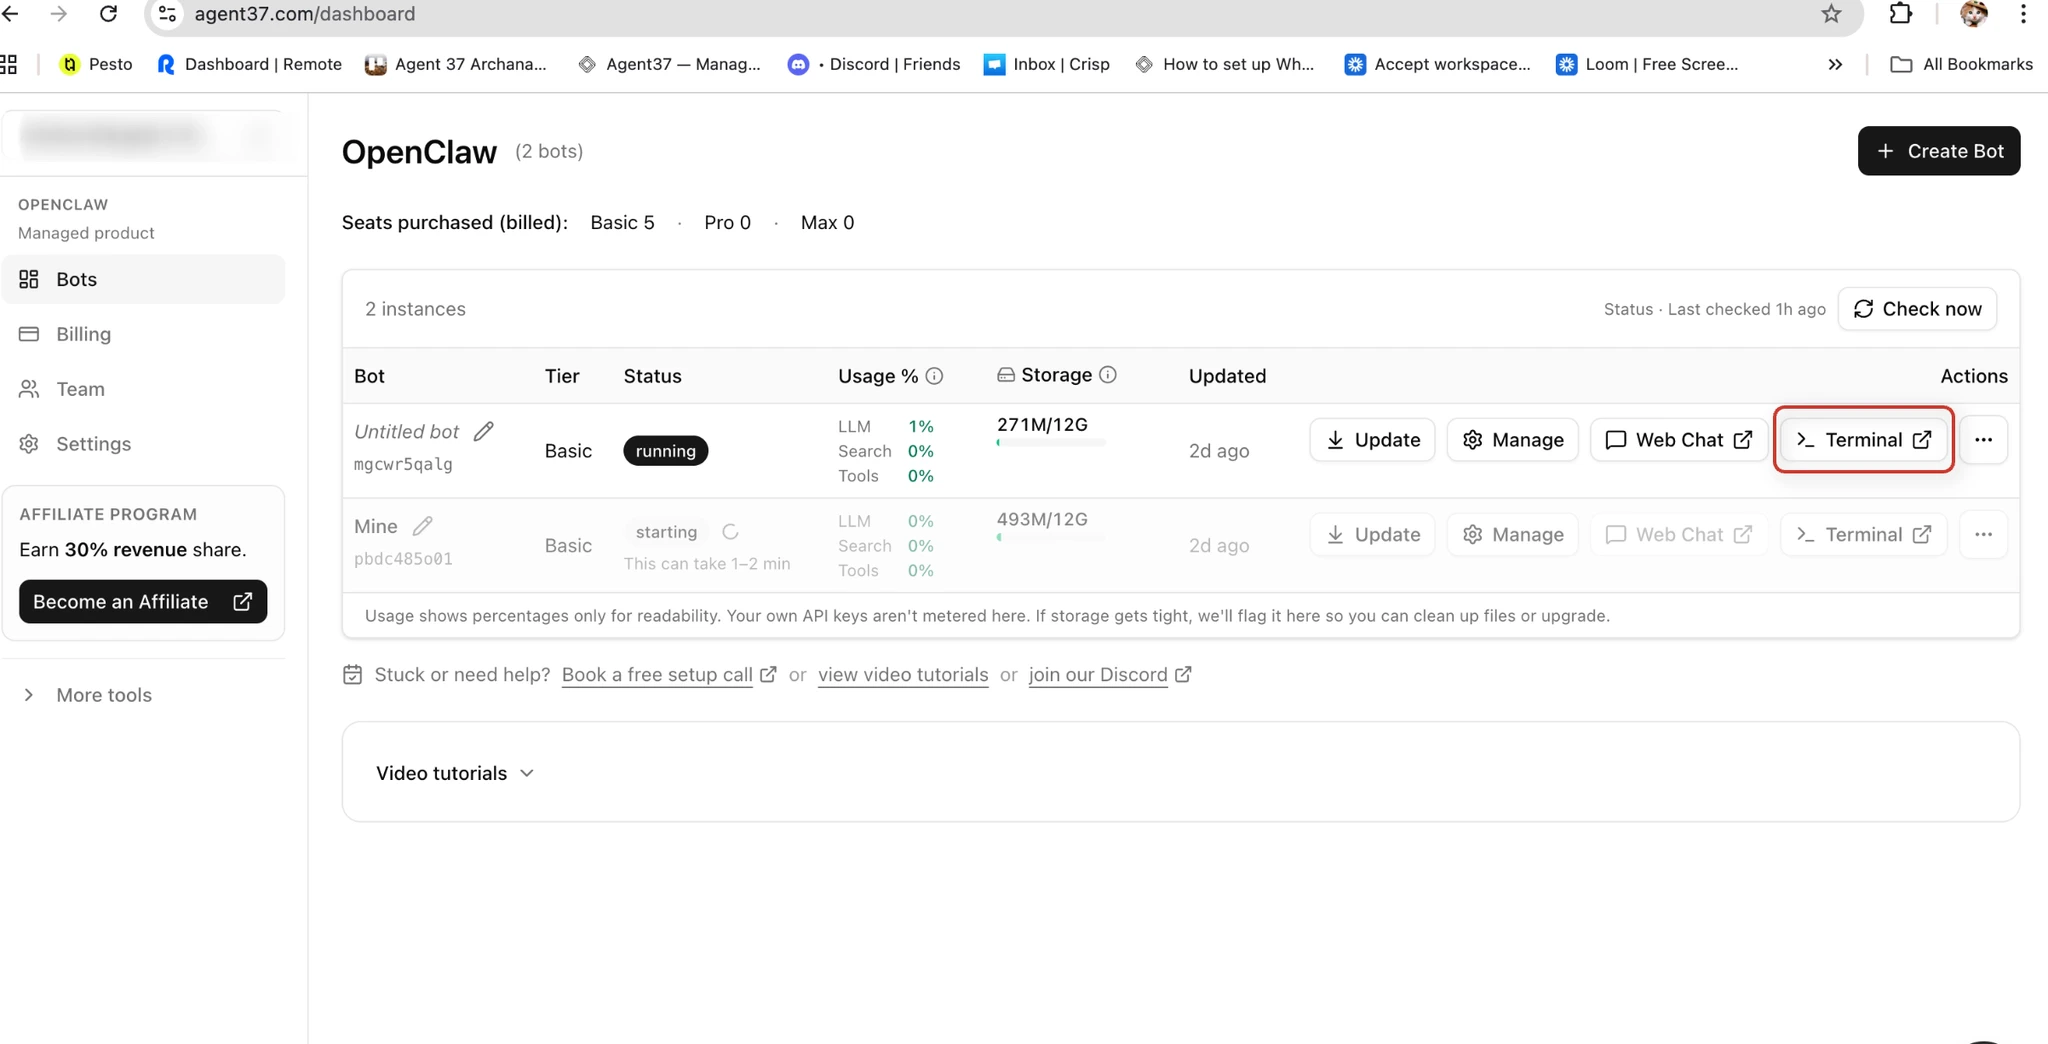
### Step 1: Open the Agent37 terminal
1. Go to [https://www.agent37.com/dashboard](https://www.agent37.com/dashboard)
2. Create an instance (or open an existing one)
3. Open **Terminal** for that instance
### Step 2: Install Tailscale on the instance
Run:
```text theme={null}
curl -fsSL | sh
```
### Step 3: **Start the Tailscale Daemon Automatically in the Background**
if you access OpenClaw Web Chat using a Tailscale IP, you may find yourself manually starting tailscaled every time your instance restarts. To avoid that extra step, add the Tailscale daemon command to `post-restart.sh` so it runs automatically in the background.
**Open** `post-restart.sh`
```text theme={null}
nano .agent37/hooks/post-restart.sh
```
**Add this command to** `post-restart.sh`
```text theme={null}
sudo tailscaled \\
--tun=userspace-networking \\
--socket=/var/run/tailscale/tailscaled.sock \\
--state=/home/node/.openclaw/tailscaled.state \\
&
```
**Save and exit**
* `Ctrl + O` to write out/save
* Press `Enter` to confirm the filename
* `Ctrl + X` to exit
If you press `Ctrl + X` first and it asks to save, press `Y`, then `Enter`
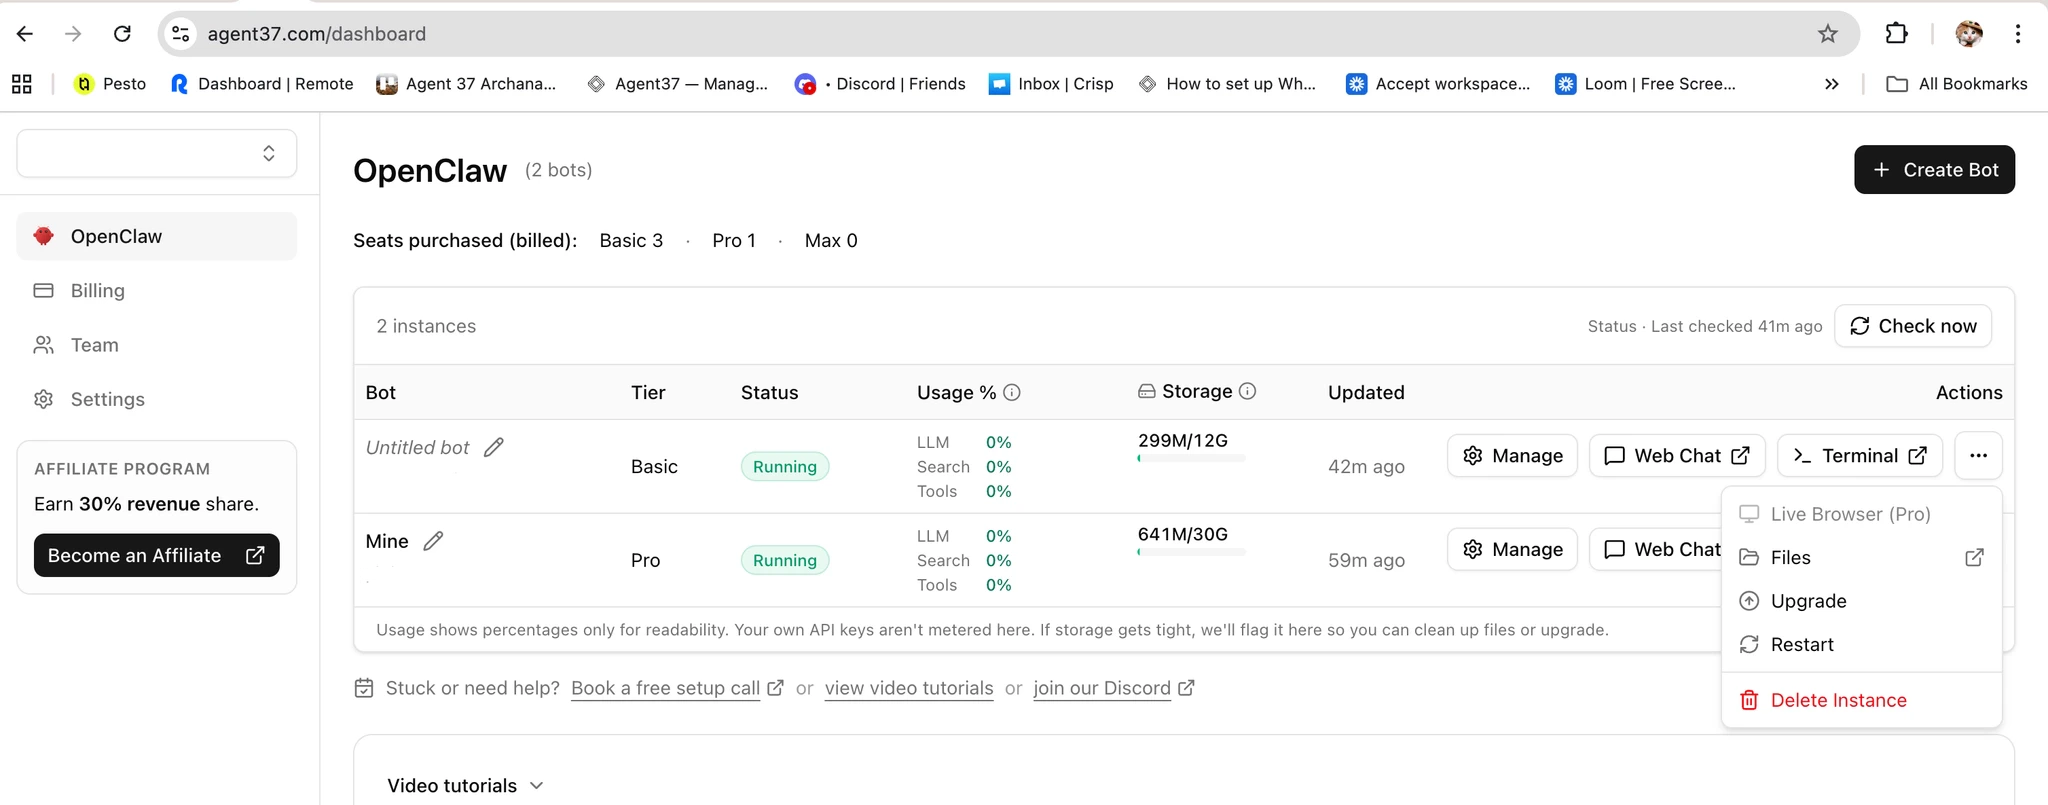
**Restart your OpenClaw instance**
After saving the file, restart your OpenClaw instance from the Agent37 dashboard.
#### **Why this helps**
Adding this command to `post-restart.sh` makes startup smoother:
* You no longer need to manually start tailscaled each time.
* The Tailscale daemon keeps running in the background.
* OpenClaw Web Chat continues to work with the same Tailscale IP flow.
This is a small change, but it removes a repetitive manual step and makes the OpenClaw workflow much more convenient. If you regularly access OpenClaw Web Chat through Tailscale, this is an easy improvement that helps streamline the workflow.
### Step 4: Bring Tailscale up (authenticate)
Open the Terminal and Run:
```text theme={null}
sudo tailscale up
```
You’ll see a login URL like `https://login.tailscale.com/a/xxxxx`.
1. Open that URL in your browser
2. Sign in to the same Tailscale account/Tailnet as your laptop
### Step 5: Verify the instance is online and get its Tailnet IP
Run:
```text theme={null}
tailscale status
```
You should see your instance with a **100.x.x.x** IP and an **online** status, for example:
```text theme={null}
100.90.12.5 my-instance online
```
Save this IP. You’ll use it in the Web Chat URL and in `allowedOrigins`.
## Part C: Whitelist the Web Chat origin + copy the gateway token
This step prevents browser-origin/CORS blocks and ensures only allowed origins can open the control UI.
### Step 1: Open `openclaw.json`
1. Go to [https://www.agent37.com/dashboard](https://www.agent37.com/dashboard)
2. Open your instance
3. Go to **Actions → Files**
4. Open `openclaw.json`
### Step 2: Add your Web Chat origin to `allowedOrigins`
Add the instance’s Tailscale IP with port `18789`.
* Use the same scheme you will use in the browser (typically `http://`).
* The origin must match exactly: scheme + host + port.
Example:
```text theme={null}
"gateway": {
"mode": "local",
"controlUi": {
"allowedOrigins": [
""
]
},
"auth": {
"mode": "token",
"token": "xxxxxxxxxxxx"
}
}
```
### Step 3: Copy the gateway token
Copy `gateway.auth.token`. You’ll paste it into Web Chat when prompted.
## Part D: Open Web Chat from your laptop
### Step 1: Confirm both devices are on the same Tailnet
* Laptop: Tailscale is **On** and shows **Connected**
* Instance: shows **online** in `tailscale status`
### Step 2: Open the Web Chat URL
In your browser, open:
* `http://:18789/`
Example:
* `http://100.90.12.5:18789/`
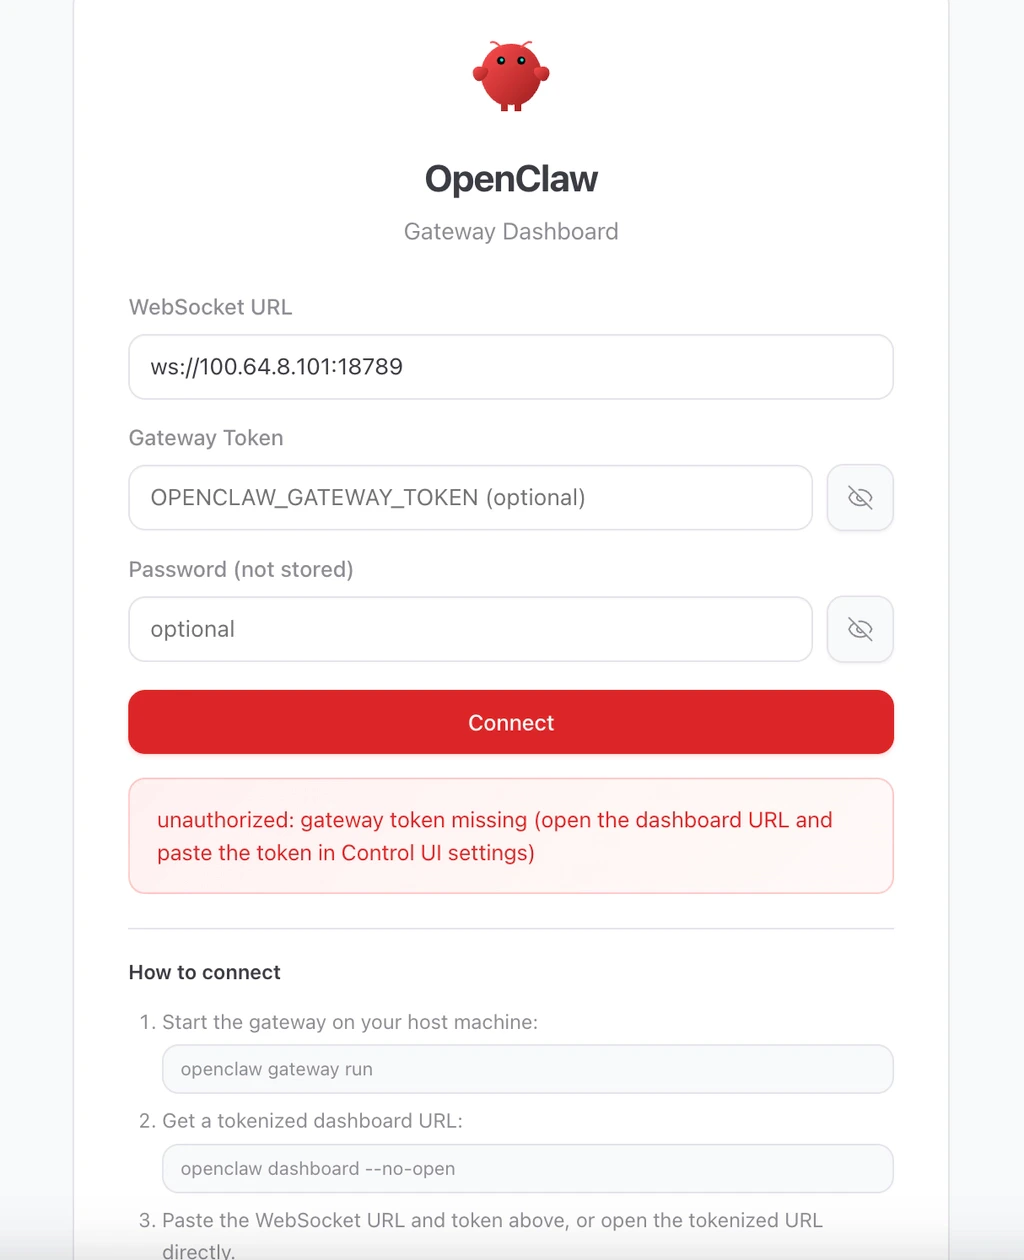
### Step 3: Authenticate in the Web Chat UI
When prompted, paste the token from `openclaw.json` → `gateway.auth.token`
### Step 4: Validate it works
* Click **Connect** (you should see a connected state)
* Send a test message in the chat box
* Confirm that your OpenClaw bot responds normally
If the bot responds, your Web Chat is working through Tailscale.
## Troubleshooting
### Page doesn’t load
* Confirm the instance is online: `tailscale status`
* Confirm you used the correct instance IP (100.x.x.x)
* Confirm you included the port: `:18789`
### “Origin not allowed” / CORS issues
* Ensure `gateway.controlUi.allowedOrigins` includes the exact origin you opened:
* `http://100.x.x.x:18789` (scheme + IP + port must match)
* If you changed the IP (new instance) or changed ports, update `allowedOrigins` accordingly
### Token rejected
* Make sure you copied `gateway.auth.token` (not another token)
* Re-open `openclaw.json` and re-copy (avoid hidden whitespace)
### Instance appears offline
* Re-run:
* `sudo tailscaled ... &` (if the daemon isn’t running)
* `sudo tailscale up` (if the node isn’t authenticated)
### Multiple accounts / devices
* Laptop and instance must be signed into the same Tailnet/account in Tailscale
## When to use this setup
This setup is a good fit when you want:
* secure remote access without exposing a public port
* access to Web Chat from another laptop or mobile device
* a simple private-network workflow for testing OpenClaw
This approach works best when both your OpenClaw host and your client devices stay connected to the same Tailscale network. It gives you private access without the usual public networking setup.
 ## Part B: Connect your Agent37 instance to Tailscale
### Step 1: Open the Agent37 terminal
1. Go to [https://www.agent37.com/dashboard](https://www.agent37.com/dashboard)
2. Create an instance (or open an existing one)
3. Open **Terminal** for that instance
## Part B: Connect your Agent37 instance to Tailscale
### Step 1: Open the Agent37 terminal
1. Go to [https://www.agent37.com/dashboard](https://www.agent37.com/dashboard)
2. Create an instance (or open an existing one)
3. Open **Terminal** for that instance
 ### Step 2: Install Tailscale on the instance
Run:
```text theme={null}
curl -fsSL
### Step 2: Install Tailscale on the instance
Run:
```text theme={null}
curl -fsSL 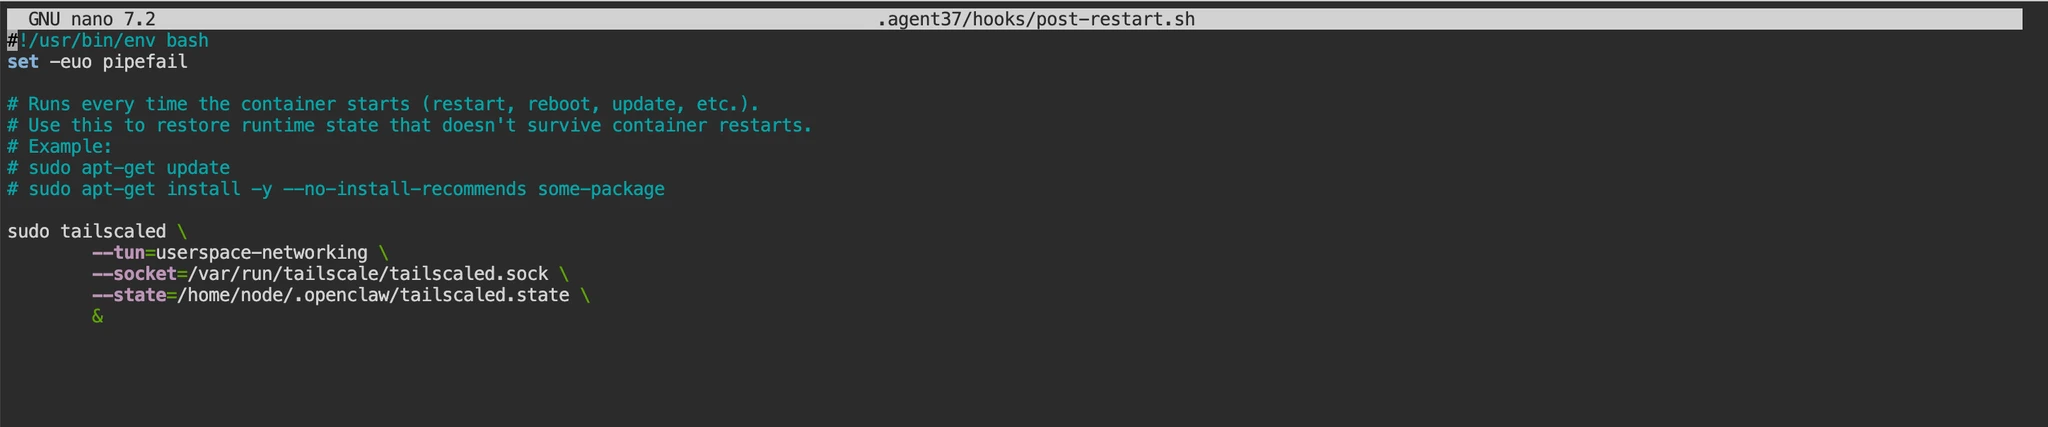 **Save and exit**
* `Ctrl + O` to write out/save
* Press `Enter` to confirm the filename
* `Ctrl + X` to exit
If you press `Ctrl + X` first and it asks to save, press `Y`, then `Enter`
**Restart your OpenClaw instance**
After saving the file, restart your OpenClaw instance from the Agent37 dashboard.
**Save and exit**
* `Ctrl + O` to write out/save
* Press `Enter` to confirm the filename
* `Ctrl + X` to exit
If you press `Ctrl + X` first and it asks to save, press `Y`, then `Enter`
**Restart your OpenClaw instance**
After saving the file, restart your OpenClaw instance from the Agent37 dashboard.
 #### **Why this helps**
Adding this command to `post-restart.sh` makes startup smoother:
* You no longer need to manually start tailscaled each time.
* The Tailscale daemon keeps running in the background.
* OpenClaw Web Chat continues to work with the same Tailscale IP flow.
This is a small change, but it removes a repetitive manual step and makes the OpenClaw workflow much more convenient. If you regularly access OpenClaw Web Chat through Tailscale, this is an easy improvement that helps streamline the workflow.
### Step 4: Bring Tailscale up (authenticate)
Open the Terminal and Run:
```text theme={null}
sudo tailscale up
```
You’ll see a login URL like `https://login.tailscale.com/a/xxxxx`.
1. Open that URL in your browser
2. Sign in to the same Tailscale account/Tailnet as your laptop
### Step 5: Verify the instance is online and get its Tailnet IP
Run:
```text theme={null}
tailscale status
```
You should see your instance with a **100.x.x.x** IP and an **online** status, for example:
```text theme={null}
100.90.12.5 my-instance online
```
Save this IP. You’ll use it in the Web Chat URL and in `allowedOrigins`.
## Part C: Whitelist the Web Chat origin + copy the gateway token
This step prevents browser-origin/CORS blocks and ensures only allowed origins can open the control UI.
### Step 1: Open `openclaw.json`
1. Go to [https://www.agent37.com/dashboard](https://www.agent37.com/dashboard)
2. Open your instance
3. Go to **Actions → Files**
4. Open `openclaw.json`
### Step 2: Add your Web Chat origin to `allowedOrigins`
Add the instance’s Tailscale IP with port `18789`.
* Use the same scheme you will use in the browser (typically `http://`).
* The origin must match exactly: scheme + host + port.
Example:
```text theme={null}
"gateway": {
"mode": "local",
"controlUi": {
"allowedOrigins": [
"
#### **Why this helps**
Adding this command to `post-restart.sh` makes startup smoother:
* You no longer need to manually start tailscaled each time.
* The Tailscale daemon keeps running in the background.
* OpenClaw Web Chat continues to work with the same Tailscale IP flow.
This is a small change, but it removes a repetitive manual step and makes the OpenClaw workflow much more convenient. If you regularly access OpenClaw Web Chat through Tailscale, this is an easy improvement that helps streamline the workflow.
### Step 4: Bring Tailscale up (authenticate)
Open the Terminal and Run:
```text theme={null}
sudo tailscale up
```
You’ll see a login URL like `https://login.tailscale.com/a/xxxxx`.
1. Open that URL in your browser
2. Sign in to the same Tailscale account/Tailnet as your laptop
### Step 5: Verify the instance is online and get its Tailnet IP
Run:
```text theme={null}
tailscale status
```
You should see your instance with a **100.x.x.x** IP and an **online** status, for example:
```text theme={null}
100.90.12.5 my-instance online
```
Save this IP. You’ll use it in the Web Chat URL and in `allowedOrigins`.
## Part C: Whitelist the Web Chat origin + copy the gateway token
This step prevents browser-origin/CORS blocks and ensures only allowed origins can open the control UI.
### Step 1: Open `openclaw.json`
1. Go to [https://www.agent37.com/dashboard](https://www.agent37.com/dashboard)
2. Open your instance
3. Go to **Actions → Files**
4. Open `openclaw.json`
### Step 2: Add your Web Chat origin to `allowedOrigins`
Add the instance’s Tailscale IP with port `18789`.
* Use the same scheme you will use in the browser (typically `http://`).
* The origin must match exactly: scheme + host + port.
Example:
```text theme={null}
"gateway": {
"mode": "local",
"controlUi": {
"allowedOrigins": [
" ### Step 4: Validate it works
* Click **Connect** (you should see a connected state)
* Send a test message in the chat box
* Confirm that your OpenClaw bot responds normally
If the bot responds, your Web Chat is working through Tailscale.
## Troubleshooting
### Page doesn’t load
* Confirm the instance is online: `tailscale status`
* Confirm you used the correct instance IP (100.x.x.x)
* Confirm you included the port: `:18789`
### “Origin not allowed” / CORS issues
* Ensure `gateway.controlUi.allowedOrigins` includes the exact origin you opened:
* `http://100.x.x.x:18789` (scheme + IP + port must match)
* If you changed the IP (new instance) or changed ports, update `allowedOrigins` accordingly
### Token rejected
* Make sure you copied `gateway.auth.token` (not another token)
* Re-open `openclaw.json` and re-copy (avoid hidden whitespace)
### Instance appears offline
* Re-run:
* `sudo tailscaled ... &` (if the daemon isn’t running)
* `sudo tailscale up` (if the node isn’t authenticated)
### Multiple accounts / devices
* Laptop and instance must be signed into the same Tailnet/account in Tailscale
## When to use this setup
This setup is a good fit when you want:
* secure remote access without exposing a public port
* access to Web Chat from another laptop or mobile device
* a simple private-network workflow for testing OpenClaw
### Step 4: Validate it works
* Click **Connect** (you should see a connected state)
* Send a test message in the chat box
* Confirm that your OpenClaw bot responds normally
If the bot responds, your Web Chat is working through Tailscale.
## Troubleshooting
### Page doesn’t load
* Confirm the instance is online: `tailscale status`
* Confirm you used the correct instance IP (100.x.x.x)
* Confirm you included the port: `:18789`
### “Origin not allowed” / CORS issues
* Ensure `gateway.controlUi.allowedOrigins` includes the exact origin you opened:
* `http://100.x.x.x:18789` (scheme + IP + port must match)
* If you changed the IP (new instance) or changed ports, update `allowedOrigins` accordingly
### Token rejected
* Make sure you copied `gateway.auth.token` (not another token)
* Re-open `openclaw.json` and re-copy (avoid hidden whitespace)
### Instance appears offline
* Re-run:
* `sudo tailscaled ... &` (if the daemon isn’t running)
* `sudo tailscale up` (if the node isn’t authenticated)
### Multiple accounts / devices
* Laptop and instance must be signed into the same Tailnet/account in Tailscale
## When to use this setup
This setup is a good fit when you want:
* secure remote access without exposing a public port
* access to Web Chat from another laptop or mobile device
* a simple private-network workflow for testing OpenClaw