> ## Documentation Index
> Fetch the complete documentation index at: https://agent37.com/docs/llms.txt
> Use this file to discover all available pages before exploring further.
# Agent37 Starter Kit
> A white-label, multi-tenant agent dashboard built on the Agent37 API — fork it, point it at your key, rebrand it, and ship the fastest way to put Agent37 in front of your users.
The **Agent37 Starter Kit** is a complete, white-label agent app built entirely on the public Agent37 API. It is a multi-tenant dashboard for creating and managing agent [instances](/agents-api/instances) — with a native chat, file browser, and app integrations for each agent. Fork it, point it at your `sk_live_` key, change the name and logo, and deploy: you get a branded product on top of Agent37 without building the control plane or the agent UIs yourself.
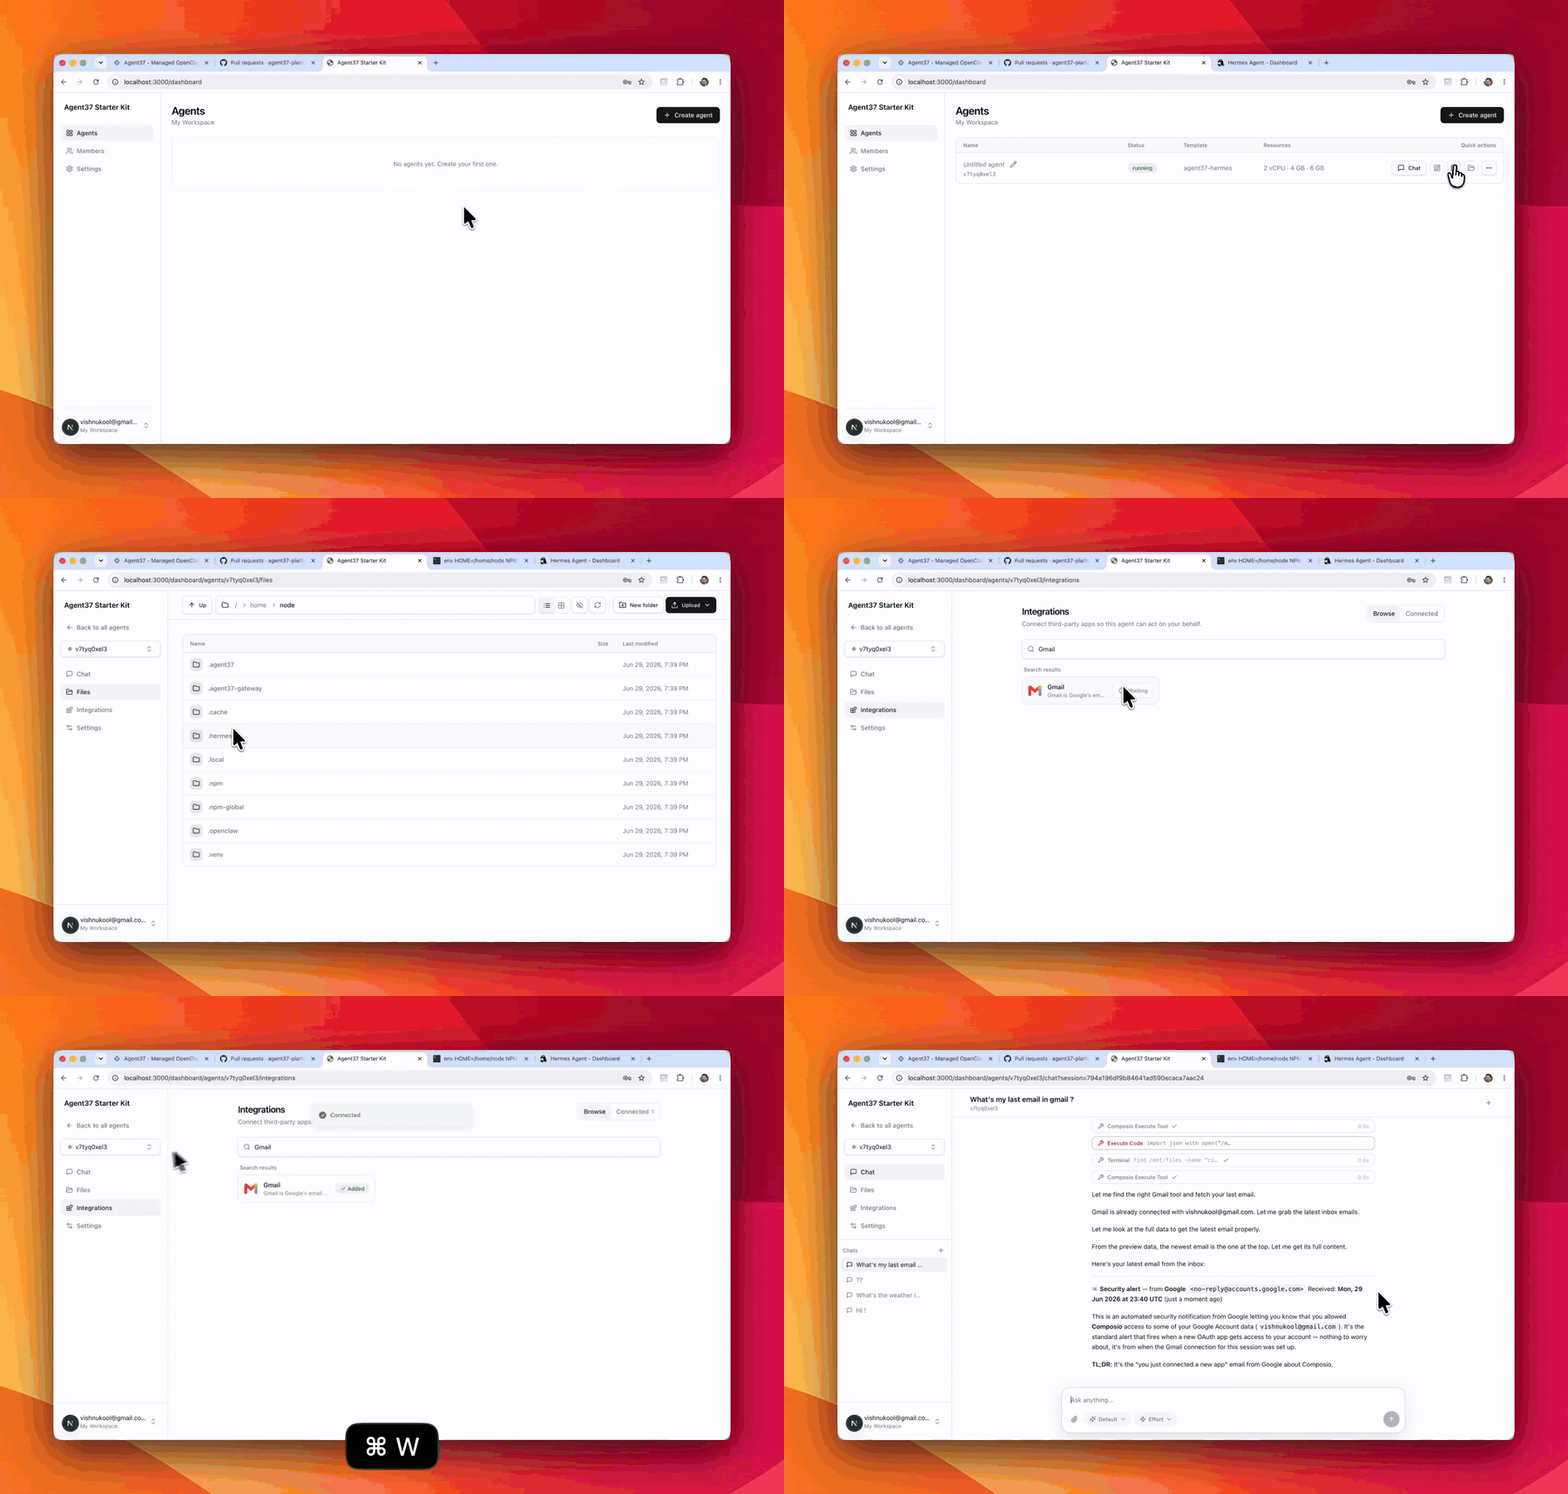
The dashboard, ready to fork. Next.js and Supabase, deploys to Vercel. Clone it, add your keys, run `npm run setup`, and rebrand. (Formerly the `whitelabel` repo — the URL still redirects.)
 ## What you get
* **Multi-tenant from the start.** Email-and-password sign-in through Supabase (open signup, no verification), with workspaces, team members, and invitations. Each agent is scoped to a workspace, and one user can belong to several.
* **Full instance management.** Create, start, stop, restart, resize, roll to a new image, and delete instances — every [instance](/agents-api/instances) action wrapped in a UI, with per-agent [budgets](/agents-api/budgets) and usage.
* **A native workspace per agent.** Click an agent to open a tabbed workspace — **Chat**, **Files**, **Integrations**, and **Settings** — built right into the dashboard. Chat streams responses through the [Agent API](/agents-api/chat), and the file browser lists, reads, and writes the agent's files through the [Files API](/agents-api/files).
* **One-click access to each agent's own UIs.** Alongside the native tabs, the dashboard mints [signed URLs](/agents-api/urls#browser-access-with-signed-urls) to open an instance's built-in terminal, file browser, and dashboard in a new tab — so both styles of access ship out of the box.
* **App integrations per agent.** Connect Gmail, Slack, Notion, and more to each instance through the [App integrations](/agents-api/integrations) endpoints, so your users authorize their own accounts from your branded UI.
* **Your choice of agent.** The create screen offers a curated catalog — Hermes and OpenClaw on Agent37's stock images — or [your own image](/agents-api/custom-image), built from the included scaffold.
* **Your key stays server-side.** Every Agent37 call goes through the app's own backend (a BFF); the `sk_live_` key is never exposed to the browser.
## Get started
You need a funded workspace and an `sk_live_` [API key](https://www.agent37.com/dashboard/cloud/api-keys), plus a Supabase access token — the starter provisions a free Supabase project for you. See [Billing](/agents-api/billing) to fund the wallet.
```bash theme={null}
git clone https://github.com/agent37-platform/starter-kit
cd starter-kit
```
The fastest path is agent-driven: open the folder in Claude Code or Codex and paste the setup prompt from the README. It installs dependencies, asks for your two keys, provisions Supabase, and starts the app.
To do it by hand, run `npm install`, then `npm run setup` and paste your keys when prompted — it creates the Supabase project, runs the migration, and enables email auth.
```bash theme={null}
npm run dev
```
Open `http://localhost:3000` and sign up with an email and password. The repo's `SETUP.md` has the authoritative steps, a manual Supabase path, and the Vercel deploy guide.
## Make it yours
Rebranding is the point, and most of it is configuration:
* **Name and logo** — set `appName` and `logoUrl` in `src/config/branding.ts`. Branding is code-side now, so it's versioned with your fork (not env-driven).
* **Colors and theme** — Tailwind, in the app's styles.
* **Your domain** — deploy to Vercel and point your domain at it.
When you deploy, set `AGENT37_API_KEY`, the public Supabase variables, and the server-only `SUPABASE_SERVICE_ROLE_KEY`, and keep the setup-only secrets (the Supabase access token and database password) out of production. The repo's `SETUP.md` lists exactly which variables to set where.
## What it does and doesn't do
The dashboard runs entirely on your Agent37 [wallet and budgets](/agents-api/billing): it sets a managed-spend cap per agent and shows usage, but it does not bill your end users — payments are intentionally excluded, so add your own billing (the create route marks where an entitlement gate would go) when you charge them.
It is a **client** of the Agent37 API, not a reimplementation of it: the chat and file tabs proxy the [Agent API](/agents-api/chat) through the app's backend, and everything the app can do is a subset of the public `/v1` surface. The API, not this code, is the authority on what an agent can and cannot do.
Want to build the experience yourself instead of forking the dashboard? See [Build a chat app](/agents-api/chat-app) for the integration pattern, or [Custom agent image](/agents-api/custom-image) to change what the agent can do.
## What you get
* **Multi-tenant from the start.** Email-and-password sign-in through Supabase (open signup, no verification), with workspaces, team members, and invitations. Each agent is scoped to a workspace, and one user can belong to several.
* **Full instance management.** Create, start, stop, restart, resize, roll to a new image, and delete instances — every [instance](/agents-api/instances) action wrapped in a UI, with per-agent [budgets](/agents-api/budgets) and usage.
* **A native workspace per agent.** Click an agent to open a tabbed workspace — **Chat**, **Files**, **Integrations**, and **Settings** — built right into the dashboard. Chat streams responses through the [Agent API](/agents-api/chat), and the file browser lists, reads, and writes the agent's files through the [Files API](/agents-api/files).
* **One-click access to each agent's own UIs.** Alongside the native tabs, the dashboard mints [signed URLs](/agents-api/urls#browser-access-with-signed-urls) to open an instance's built-in terminal, file browser, and dashboard in a new tab — so both styles of access ship out of the box.
* **App integrations per agent.** Connect Gmail, Slack, Notion, and more to each instance through the [App integrations](/agents-api/integrations) endpoints, so your users authorize their own accounts from your branded UI.
* **Your choice of agent.** The create screen offers a curated catalog — Hermes and OpenClaw on Agent37's stock images — or [your own image](/agents-api/custom-image), built from the included scaffold.
* **Your key stays server-side.** Every Agent37 call goes through the app's own backend (a BFF); the `sk_live_` key is never exposed to the browser.
## Get started
You need a funded workspace and an `sk_live_` [API key](https://www.agent37.com/dashboard/cloud/api-keys), plus a Supabase access token — the starter provisions a free Supabase project for you. See [Billing](/agents-api/billing) to fund the wallet.
```bash theme={null}
git clone https://github.com/agent37-platform/starter-kit
cd starter-kit
```
The fastest path is agent-driven: open the folder in Claude Code or Codex and paste the setup prompt from the README. It installs dependencies, asks for your two keys, provisions Supabase, and starts the app.
To do it by hand, run `npm install`, then `npm run setup` and paste your keys when prompted — it creates the Supabase project, runs the migration, and enables email auth.
```bash theme={null}
npm run dev
```
Open `http://localhost:3000` and sign up with an email and password. The repo's `SETUP.md` has the authoritative steps, a manual Supabase path, and the Vercel deploy guide.
## Make it yours
Rebranding is the point, and most of it is configuration:
* **Name and logo** — set `appName` and `logoUrl` in `src/config/branding.ts`. Branding is code-side now, so it's versioned with your fork (not env-driven).
* **Colors and theme** — Tailwind, in the app's styles.
* **Your domain** — deploy to Vercel and point your domain at it.
When you deploy, set `AGENT37_API_KEY`, the public Supabase variables, and the server-only `SUPABASE_SERVICE_ROLE_KEY`, and keep the setup-only secrets (the Supabase access token and database password) out of production. The repo's `SETUP.md` lists exactly which variables to set where.
## What it does and doesn't do
The dashboard runs entirely on your Agent37 [wallet and budgets](/agents-api/billing): it sets a managed-spend cap per agent and shows usage, but it does not bill your end users — payments are intentionally excluded, so add your own billing (the create route marks where an entitlement gate would go) when you charge them.
It is a **client** of the Agent37 API, not a reimplementation of it: the chat and file tabs proxy the [Agent API](/agents-api/chat) through the app's backend, and everything the app can do is a subset of the public `/v1` surface. The API, not this code, is the authority on what an agent can and cannot do.
Want to build the experience yourself instead of forking the dashboard? See [Build a chat app](/agents-api/chat-app) for the integration pattern, or [Custom agent image](/agents-api/custom-image) to change what the agent can do.